Configuration Assistant Guide
Table of contents
Table of contents
- Configuration Assistant Guide
- Introduction
- Getting Started
- Understanding the Sheet Types
- Using the File Menu
- Using the Tool Specific Menu Bar
- Summary Sheet
- Creating a Mast & Logic Sheets
- Mast Sheets
- Logic Sheet
Introduction
The CDI Configuration Assistant is an optional LCC Fusion tool designed to simplify the creation of CDI (Configuration Description Information) configuration files for signaling setups within the LCC Fusion Project. This spreadsheet-based assistant helps installers, testers, and layout planners define signaling components such as signal masts, logic statements, and block detection methods.
The assistant generates the required .txt file that contains a complete or partial CDI fragment. This file can be restored into a device using tools such as:
- JMRI’s LCC Configuration Tool, or
- The LCC Fusion CDI Configuration Tool (Desktop version).
This makes it easy to experiment, configure, and later load configurations directly onto an LCC Node.
The tool is designed specifically for use with LCC Fusion Project Node Cards, and works seamlessly with the default Event ID conventions used for each supported card type. Whether you’re preparing an initial setup or modifying an existing one, the assistant ensures the structure and format of your configuration is correct and consistent.
Key Capabilities of the CDI Configuration Assistant
1. Comprehensive CDI File Creation & Management
- Generate fully accurate CDI configuration files compatible with LCC devices.
- Store and manage multiple signaling configurations within a single spreadsheet.
- Easily save and restore configurations as CDI-compatible text snippets.
2. Structured, Editable Documentation
- Track your entire signaling plan in an organized, editable workbook.
- Summary sheet provides a bird’s-eye view of all masts and logic rules, highlighting errors and warnings.
- Comment fields allow you to document the purpose and logic behind each configuration item.
3. User-Friendly Interaction & Guidance
- Integrated in-sheet help via hover-over tooltips for each input field.
- Step-by-step wizards guide you through complex configuration tasks.
- Sheet protection ensures only input cells can be edited, preventing accidental changes.
- Context menus, toolbar buttons, and menu options for managing sheets (duplicate, rename, delete) make configuration easy and safe.
4. Signal Mast Configuration
- Dedicated sheets for each signal mast with individual configuration and description.
- Automatically hide unused mast and lamp fields for clarity.
- Pre-built examples for common mast types (2-aspect, 3-aspect) help jump-start configuration.
- Automatic Track Circuit assignment linked to mast configurations.
- One-click export of mast settings to CDI-restorable text files.
5. Advanced Logic & Conditional Configuration
- Define complex signaling logic using flexible if-then-else statements.
- Organize logic into multiple sheets for different nodes, zones, or control points.
- Toolbar and right-click menus for easy logic statement management: delete, copy, move, renumber.
- Auto-generated Event IDs, smartly derived from mast rules and condition sources.
- Dynamic hiding of fields based on conditional types and operator complexity.
- Logic summary fields highlight potential errors for review.
- Export logic configurations with a single button to CDI-restorable text files.
6. Event ID & Block Occupancy Support
- Supports default Event ID generation aligned with your mast and logic definitions.
- Configure block occupancy detection methods with easy-to-use selectors.
7. Summary & Review
- Central summary sheet provides a comprehensive overview of all defined masts and logic rules.
- Highlights potential configuration issues, making troubleshooting easier.
- Allows quick navigation and verification across multiple configuration sheets.
8. Flexible & Extendable
- Designed to accommodate complex signaling systems with multiple nodes and control points.
- Modular approach simplifies scaling and maintenance of large layouts.
Getting Started
The CDI Configuration Assistant spreadsheet is designed for use with LibreOffice Calc, a free and open-source spreadsheet program included in the LibreOffice suite. This section walks you through how to download LibreOffice, run Calc, and open the assistant file provided with the LCC Fusion Project.
Download LibreOffice
LibreOffice Calc is part of the LibreOffice suite, which can be downloaded at:
👉 https://www.libreoffice.org/download
Once on the site:
- The correct version for your operating system is typically preselected.
- Click Download to get the installer for Windows, macOS, or Linux.
Install or Run Without Installing
Option A: Standard Installation (Recommended)
- Run the downloaded installer.
- Follow the installation wizard prompts to install LibreOffice to your system.
- Once installed, launch LibreOffice Calc from your Start menu or applications folder.
Option B: Run Without Installing (Portable Mode for Windows)
- Download the LibreOffice Portable version from: https://portableapps.com/apps/office/libreoffice_portable
- Extract the archive to a folder of your choice (e.g., USB stick or desktop folder).
- Launch the
LibreOfficePortable.exefile, then select Calc from the launcher.
Open the CDI Configuration Assistant
Open the Template
You can download the latest version of the template here:
/assets/tools/CDI_Configuration_Assistant/CDI_Configuration_Assistant.ots
Option A: Open as a New File (Recommended)
-
Double-click the downloaded
.otsfile. – Or open it via File → Open in LibreOffice. -
LibreOffice will create a new, untitled
.odsspreadsheet based on the template. -
Save your new file with a new name such as:
My_Signal_Config.ods
This method ensures the original template stays unchanged and always ready for reuse.
Option B: Install the Template into LibreOffice
- Open LibreOffice.
- Go to File → Templates → Manage Templates.
- Click Import and select the
.otsfile. - The template will now appear under “My Templates.”
- Use File → New → Templates to create a new configuration whenever needed.
Enable Macro Support
The CDI Configuration Assistant includes embedded macros that enable features like alignment, formatting, and snippet generation. LibreOffice may prompt you to enable macros when you open the spreadsheet.
To ensure the assistant functions correctly:
- When prompted, choose “Enable Macros”.
- If you see a warning bar across the top of the document, click “Enable Content” or “Enable Macros”.
- If no prompt appears, or if macros seem disabled:
Manually Allow Macros
- Go to Tools > Options.
- Navigate to LibreOffice > Security > Macro Security.
- Set the security level to Medium or Low (recommended: Medium, which will prompt you for approval).
- Click OK and reopen the
.odsfile if needed.
Note: Macros must be enabled for the assistant’s automation features to work properly. The macros in this assistant are safe to run and do not access files or external systems.
Once opened, you’ll be ready to begin entering and managing your signaling configurations. Only the designated input cells are editable; all others are locked to prevent accidental changes.
Perfect—introducing the types of sheets next is a natural continuation. Here’s a draft section titled “Understanding the Sheet Types”, placed after “Getting Started”:
Versioning Your Configuration
When you open the template (.ots), LibreOffice automatically creates a new, untitled .ods file based on it. Before you begin editing, it’s a good idea to:
-
Save the file immediately using File → Save As…
-
Choose a filename that includes a version or description, such as:
CopyEdit My_Signal_Config_v1.0.ods -
Consider keeping multiple versions (e.g.,
v1.0,v1.1, etc.) as you make changes, especially before exporting CDI text or making hardware changes.
You can also add a version label inside the sheet itself, such as in a designated “info” cell on the Summary sheet or in a footer row.
This approach makes it easier to:
- Revert to a previous version if needed.
- Track what changes were made.
- Share consistent files with teammates or testers.
Understanding the Sheet Types
The CDI Configuration Assistant is organized into multiple sheet tabs, each with a specific purpose in the configuration process. Understanding what each sheet type does will help you navigate the assistant more effectively and know where to enter your data.
Summary Sheet
The Summary sheet is the first tab you’ll see when opening the CDI Configuration Assistant. It provides a centralized, read-only overview of your entire configuration, including all defined masts, logic rules, and other elements.
Note: This sheet is not meant to be edited directly. Therefore, it is protected to prevent accidental changes. All values shown in this sheet are automatically pulled from the other configuration tabs.
Key features of the Summary sheet include:
- A snapshot of all defined masts, including aspect names, lamp usage, and event assignments.
- A summary of logic rules, including input conditions, results, and comments.
- Links to each configuration sheet for easy navigation.
- Built-in checks for detecting duplicates, inconsistencies, or missing data.
This sheet serves both as a dashboard during configuration and as a review tool before exporting or restoring your CDI data.
Mast Sheets
- Each mast (e.g., a signal head with multiple aspects) is defined in its own Mast sheet tab.
- These tabs are used to:
- Assign default event IDs for each aspect.
- Specify lamp numbers and colors.
- Describe the signal’s purpose (e.g., DWARF, 3-aspect main, etc.).
- Generate a CDI snippet for each mast automatically.
- You can create multiple Mast tabs—one for each physical or logical signal.
Logic Sheets
- These tabs define if-then-else logic rules that control how signals behave.
- Each Logic sheet lets you:
- Reference other event IDs (e.g., from block detectors or turnout feedback).
- Create conditional logic using structured rows.
- Assign descriptions and optional pictures or icons for clarity.
- Like Mast sheets, you can have multiple Logic tabs grouped by function or location.
Using the File Menu
| Menu Option | Purpose | Recommendation |
|---|---|---|
| New / Open | Create or open .ods files |
Yes Use to manage configurations |
| Save / Save As | Save your work as an editable .ods file |
Yes Use regularly to avoid data loss |
| Save a Copy | Create a backup or alternate version of your file | Yes Useful before major edits |
| Export | Export to PDF or other formats | Yes Use for sharing read-only versions |
| Preview in Browser | Generates an HTML view of the current sheet | NoNot interactive; rarely useful |
| Templates | Save or manage document templates (.ots) |
Yes Advanced users only |
| Print / Print Preview | Print current sheet or preview layout | Yes Use for hardcopies or review |
| Printer Settings | Set default printer, paper size, orientation | Yes Use before printing if needed |
| Send | Email the document using your email client | NoRequires configuration; rarely used |
| Versions | Manage internal version history within LibreOffice | NoNot recommended; manage manually |
| Recent Documents | View and open recently edited files | Yes Convenient for accessing prior work |
| Close | Close current file | Yes Standard use |
| Exit | Exit LibreOffice completely | Yes Standard use; be sure to save first |
Note: File menu actions cannot be restricted within the template. Take care not to delete or overwrite the original
.otsfile.
Using the Tool Specific Menu Bar
Each sheet in the CDI Configuration Assistant—Summary, Mast, and Logic—includes a fixed menu bar located at the top of the sheet. This toolbar provides quick access to essential actions and ensures consistency across all configuration types.
Sheet-Specific Toolbar Feature Matrix
| Icon Name | Description | Summary Sheet | Mast Sheet | Logic Sheet |
|---|---|---|---|---|
| Zoom In | Increase zoom level | Yes | Yes | Yes |
| Zoom Out | Decrease zoom level | Yes | Yes | Yes |
| Print the entire sheet | Yes | Yes | Yes | |
| Print Preview | Preview the sheet before printing | Yes | Yes | Yes |
| Print Area | Set or clear the area to be printed | Yes | Yes | Yes |
| Save a Copy… | Save a duplicate of the current file | Yes | Yes | Yes |
| Go to Sheet | Jump to a selected sheet | Yes | Yes | |
| Rename Sheet | Rename the current sheet | Yes | Yes | |
| Delete Sheet | Delete the current sheet | Yes | Yes | |
| Save CDI To Restore File | Export the sheet’s CDI config to .txt file for restoring on an LCC Node using CDI Configuration Tools | Yes | Yes | |
| View CDI On/Off | Toggle view of the CDI restorable file content (before saving) | Yes | Yes | |
| Copy Cell Data | Copy cell contents (i.e. Event ID) | Yes | Yes | |
| Paste Data Into Cell | Paste cell contents (i.e. Event ID) | Yes | Yes |
These menu tools are built into each sheet and remain fixed for visibility. They help you efficiently navigate, document, and export your work without relying on standard LibreOffice menus.
Understanding Default Event ID Structure
An auto-generated Event ID like:
05.01.01.01.5C.66.16.E0
is composed of eight parts. Here’s what each part represents:
| Part | Example | Description |
|---|---|---|
| 1–6 | 05.01.01.01.5C.66 |
Node ID for this mast’s Node, as entered in the sheet. |
| 7 | 16 |
1 = the Card # from the sheet6 = the Card Type ID assigned by the firmware for a PWM Card when used for signaling | |
| 8 | E0 |
A sequential event ID assigned automatically by the configuration tool. It ensures uniqueness within this card type’s event space. |
If you change the Node ID or Card #, the Event ID will update automatically.
If you manually override the Event ID, it will remain fixed and no longer auto-update.
Card type identifiers (e.g.,6for PWM Card) are predefined and documented on each card’s specification page within the LCC Fusion Project.
Summary Sheet
 The Summary sheet is the first tab you’ll see when opening the CDI Configuration Assistant. It provides a centralized, read-only overview of all the Mast sheets defined in the workbook.
Note: This sheet is not meant to be edited directly. It is intentionally protected to prevent accidental changes. All data shown is automatically gathered from individual Mast sheets.
This summary serves as both dashboard and a quality check to ensure your signaling configuration is complete and well-structured—especially useful when working with numerous tabs.
Key Features:
-
Filterable Columns: Each column includes a drop-down filter, allowing you to quickly view masts by Node ID, card number, bus, or other key attributes—very helpful when many Mast sheets exist.
-
Clickable Sheet Links: The first column lists the name of each Mast sheet. Clicking the link takes you directly to that sheet, making it easy to jump to the mast you want to review or edit.
-
Configuration Overview: Additional columns display important details pulled from each Mast sheet, including:
- Description
- Node ID
- Card number
- Communication Bus and Address
- Mast name
- Assigned aspects
- Lamp usage
- Generated event IDs
-
Totals Row: At the bottom of the sheet is a summary row showing the total number of unique:
- Node IDs
- Card numbers
- Buses
- Defined masts
This provides a helpful sanity check to ensure you’ve defined at least one mast on each card or Node.
Informational Warnings and Error Highlights
- Cells highlighted in yellow or red within the Summary sheet indicate potential warnings or errors.
- Yellow typically signals a soft warning—such as a mast name that may be duplicated.
- Red highlights a more critical issue—such as missing values or conflicting assignments.
- Hover your mouse over these highlighted cells to view a tooltip explaining the issue.
- Example: If “Mast 1” is defined more than once across sheets, a yellow cell will appear with a tooltip noting the duplication.
These visual cues help you catch and resolve configuration issues before generating your final CDI snippet.
| Warning/Error Message | Mast Configuration Condition Detected | Recommended Mast Configuration Fix |
|---|---|---|
| WARNING: Mast # was previously configured for this Node. | Two Mast sheets define the same Mast # on the same Node. | Use a unique Mast # for each sheet on the same Node to avoid one config silently replacing another. |
ERROR: Node <node-id> already specifies Card #<card-num> on Bus <A/B> with a different Address. |
Two Mast sheets share the same Node ID, Card #, and Comm Bus but have different Comm Address. | - If they’re on the same Node+Bus, align the Comm Address values. - If they’re different Nodes, correct the Node ID. - If they’re different cards, assign a distinct Card #. |
| WARNING: This mast is configured with an Operational Mode of Unused. | Signal Mast’s Operational Mode is set to Unused. | Verify the Operational Mode; Unused masts will not participate in signal logic. |
WARNING: Duplicate speed(s) <speeds> configured for this mast. |
The Mast has identical Speed entries listed more than once. | Ensure each Speed value is unique for a given Mast configuration. |
WARNING: Event ID <event-id> already configured for setting a mast aspect. |
The same Event ID appears in multiple “Then” or “Else” aspect fields for this Mast. | Use distinct Event IDs for each aspect, or consciously group multiple aspects under the same Event ID if intended. |
| WARNING: Rule defined without any lamps configured. | One of the mast rule’s has all lamps set to Unused and will be skipped. |
Confirm this is intentional; otherwise add or adjust rules to light the correct lamp(s). |
| **WARNING: Duplicate lamps configured for the a Mast rule. ** | Lamp is used multiple times. | Confirm this is intentional; otherwise add or adjust rules to light the correct lamp(s). |
Sheet Management
- The Summary sheet is password protected to prevent accidental deletion or modification.
- While LibreOffice still shows options like Duplicate, Delete, or Hide when you right-click the tab, these actions should not be used on the Summary sheet.
- Please do not attempt to duplicate, delete, or hide this sheet—even if the options appear in the context menu. Doing so may break formulas or references in the workbook.
Currently, the summary only includes Mast definitions. Logic sheets are not summarized at this time, though future versions may include logic overviews if a useful format is determined.
Creating a Mast & Logic Sheets
All new Mast and Logic sheets should be created by duplicating the locked Mast_Template and **Logic_Template ** sheets:
-
Right-click on either the
Mast_TemplateorLogic_Templatetab. -
Select Duplicate Sheet from the context menu.
Even though the template is protected, it can still be duplicated.
-
Rename the duplicated sheet to something user-friendly that reflects the mast it defines (e.g.,
Main1,DWARF_NB_3, etc.).- Right-click the new sheet’s tab and select Rename.
Each Mast sheet functions independently and contributes to the Summary sheet automatically once filled out.
Editing Mast & Logic Sheet Fields
Within a sheet,
- Cells are either editable or protected.
- Editable (non-protected) cells are either
tanorlight-red. - Protected cells provide labels, formatting, and structure.
- Editable (non-protected) cells are either
- Click within a cell to edit it. In many cases, a drop down list (arrow) will appear, allowing for a selection.
- Hover your cursor over each editable cell to reveal help text describing what the field is for and what type of input is expected.
- Fields are grouped by section to guide you through entering information logically and efficiently.
Saving and Viewing the CDI Snippet
Each Mast and Logic sheet includes two buttons at the top of the sheet to assist with exporting and reviewing your CDI configuration:
Save Signal Mast CDI and Save Logic CDI buttons
- This button allows you to export a CDI snippet containing the full configuration of the current mast.
- It will prompt you to save a
.txtfile that can be restored using:- The LCC Fusion CDI Configuration Tool (Desktop), or
- JMRI’s LCC Configuration Tool.
- This file includes all relevant configuration data for the mast and logics.
Toggle CDI View
- This button reveals a read-only section in the sheet showing the generated CDI fragment.
- It’s useful for:
- Reviewing the structure and content of the snippet before saving.
- Confirming that your inputs are being translated correctly into a valid CDI block.
- Use this view to verify your mast’s configuration without needing to open the
.txtexport.
Both buttons are part of the fixed menu bar found at the top of every mast sheet and are intended to streamline export and validation.
Mast Sheets
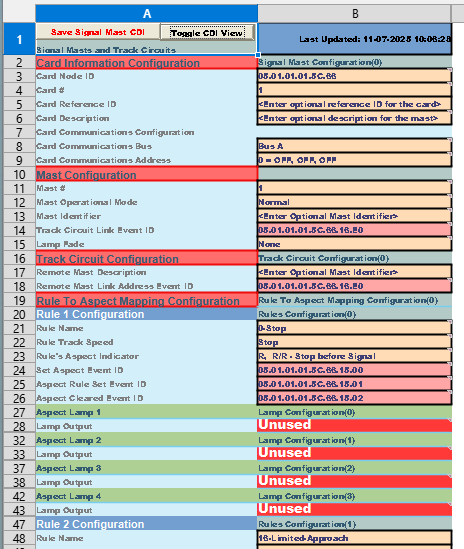 Each Mast Sheet defines a single signal mast and its configuration, including how it will be driven by the connected card, how rules map to aspects, and what event IDs are used. Mast sheets are where the majority of user input occurs in the CDI Configuration Assistant.
Automatic Event ID Updates
- The default Event IDs (shown in light-red fields) are automatically recalculated whenever you change:
- The Card Node ID
- The Card #
- These fields affect the encoding of the Event ID according to LCC Fusion Project standards.
- Custom Event IDs (manually entered) are preserved and not overwritten unless you clear the cell.
Tip: If you’re unsure whether an Event ID is custom or auto-generated, hover over the field to review the help text and expected formatting.
Key Sections Explained
Card Information
- Identify the Node ID for the Node that supports the PWM Card driving this mast.
- Enter the card number, communication bus, and address.
- These values are used to generate default Event IDs for the mast and its lamps.
Event ID Fields (Light Red)
- Cells shaded in light-red display the factory-calculated Event IDs based on your input (Node ID, Card number, Comm settings).
- These fields can be overridden by entering your own custom Event ID if needed.
- When entering a custom Event ID, the sheet performs syntax checking to ensure the format is valid (e.g., eight-part hex with dots like
05.01.01.5C.66.15.03).
Mast Configuration
- Defines the mast type and description.
- Provides structure for assigning how aspects will map to rules and lamps.
Track Circuit Configuration
- Optional section for defining track circuits (e.g., block detection) that may be used in logic definitions.
- This helps simplify logic setup by reusing pre-defined circuit names and values.
Rule to Aspect Mapping Configuration
- Define up to four rules for the mast.
- Each rule includes:
- A Rule Name
- The track speed it represents
- Up to four lamps used to form the corresponding aspect
- If a lamp for a given rule is set to “Unused”, that lamp’s row will be automatically hidden to reduce visual clutter and simplify the sheet.
Rule Activation Considerations
- You must define at least one rule, with a maximum of four rules allowed per mast.
-
Each rule may use between 0 and 4 lamps to form its aspect.
-
Unused lamps are ignored, remain dark
- If all four lamps in a rule are set to “Unused”:
- The rule is considered disabled and will be excluded from the CDI generation.
- The associated row in the sheet will be hidden to simplify the view.
- If all lamps are set to “Not Used”:
- The rule is treated as a valid Dark aspect.
- It will be included in the CDI output, indicating that no lamps should light for that rule.
- If a rule includes a mix of valid lamps and “Not Used”:
- Only the defined lamps will be used to display the aspect.
- The unused lamp cells will be ignored.
You can define multiple rules with identical lamp combinations but different speeds or names, if needed for more advanced signaling behavior.
Best Practices
- Only edit cells in column B marked in tan.
- Leave light-red Event ID fields unchanged unless you specifically need custom values.
- Always provide a meaningful mast name and description for clarity in the Summary and CDI export.
- You can duplicate an existing mast sheet to simplify the creation of similar masts—especially when multiple masts are assigned to the same LCC Fusion PWM Card.
- After duplicating, just update the description and Rule-to-Aspect mapping for the new mast.
- When you’ve finished configuring a sheet, consider locking it to prevent accidental edits. You can do this by right-clicking the sheet’s tab and selecting Protect Sheet…. No password is required unless you want to enforce it.
Logic Sheet
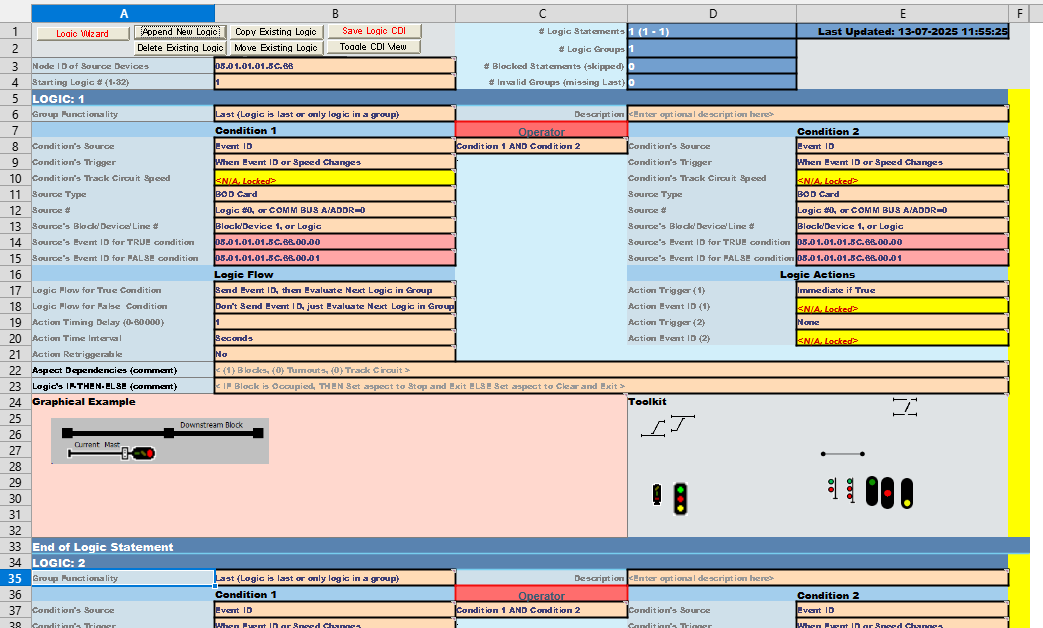 The Logic sheet lets you define up to 31 separate logic statements, each of which evaluates a set of conditions and then generates one or more Event IDs based on IF–THEN–ELSE logic. It’s more complex than the Mast sheets because of the number of fields and the ability to handle multiple statements in one worksheet.
Purpose
- Define conditional triggers that observe incoming Event IDs (e.g. block-occupied or turnout-thrown) or other cell values.
- Evaluate each statement in sequence and generate the corresponding Event ID(s) when its conditions are met.
- Coordinate multiple signal masts or route logic without writing code—everything lives in the spreadsheet.
Cross-Reference: Track Circuits
Note: Logic statements frequently depend on Track Circuit variables that you configure on the Mast sheet. The Mast’s Remote Mast Address field defaults to the Mast’s Track Circuit Link Event ID, tying that mast to its corresponding track circuit. You also select the Mast # (which doubles as the Track Circuit ID) when choosing conditions in Logic statements. For full details on setting up track circuits and link Event IDs, see the Signal Track Circuits Configuration Guide for details and examples.
Logic Statement Groups
A Logic Group is a sequence of one or more Logic Statements that are evaluated together, in order, from the first statement through to the last statement in that group. There are two basic types of statement blocks:
- Group‑type statements: These can be any number of statements that share the same Logic Group and collectively test multiple conditions. Each Group‑type statement evaluates its condition and performs the defined conditions action (send or not send an Event ID, then continue to next statement or exit group)
- Last‑type statement: This must be the final statement in a Logic Group.
By organizing your statements into Groups (followed by a single Last statement), you ensure that complex, multi‑condition logic chains can be handled in a predictable, linear fashion. You may also use a single Last‑type statement on its own if your Logic Group only needs one conditional check.
Logic Sheet Toolbar Buttons
 As an alternative to the toolbar buttons, you can right-click anywhere on the Logic sheet and navigate through **Fusion >Below are the four custom toolbar buttons on the Logic sheet:
- Logic Wizard Launches an interactive wizard that guides you step-by-step through the fields of a Logic Statement. When started, it prompts for the Logic Statement number if more than one exists. It displays each field’s comment in a dialog and lets you enter or select values using Next, Previous, and Cancel buttons. The wizard closes when you cancel or complete all fields.
- Append New Logic Duplicates the last Logic Statement block and appends it after the last defined statement, allowing you to add more rules easily.
- Delete Existing Logic Prompts you to select a Logic Statement number to remove; subsequent statements shift up and renumber to close the gap.
- Move Existing Logic Prompts you to choose a Logic Statement and a new position; it then reorders and renumbers the blocks so you can reorganize your rules.
- Copy Logic Statement Prompts you to select an existing Logic Statement to duplicate and then choose the target position to insert the copy; the selected block is copied and reinserted accordingly. Prompts you to choose a Logic Statement and a new position; it then reorders and renumbers the blocks so you can reorganize your rules.
Logic Sheet Context Menu
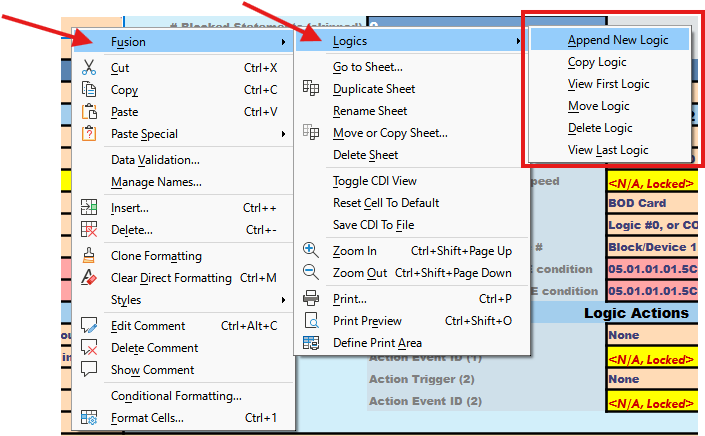 As an alternative to the toolbar buttons, you can right-click anywhere on the Logic sheet and navigate through Fusion context menus to perform the same operations:
- Append New Logic: Duplicates the last Logic Statement and appends it after the last defined statement.
- Copy Logic: Copies the selected Logic Statement to a new position in the sequence.
- View Logic: Jumps to and highlights the chosen Logic Statement.
- Move Logic: Reorders and renumbers Logic Statements by moving a selected block to a different position.
- Delete Logic: Removes the chosen Logic Statement and shifts subsequent statements up.
- View Last Logic: Navigates directly to the last defined Logic Statement in the sheet. Prompts you to choose a Logic Statement and a new position; it then reorders and renumbers the blocks so you can reorganize your rules.
Logic Summary Fields (Rows 1-4)

Hover over input cells to display the detailed help text for the field.
The first four rows at the top of the sheet contain the following common summary fields:
| Row | Field | Description |
|---|---|---|
| 1 | # Logic Statements | Count and range of Logic statements currently defined within the sheet. |
| Last Update | Date and time stamp of last edits to the sheet | |
| 2 | Number of Logic Groups | Count of groups currently defined within the sheet. Use to determine if the grouping is correct for all statements defined in the sheet. |
| 3 | # Blocked Statements (skipped) | Count of statements marked as ‘Blocked’ which means they will not be processed and are skipped. These can be useful for placeholders for future statements, saving the need to rearrange the statements and groups. |
| 4 | # Invalid Groups (missing Last) | Count of statement Groups that do not have a Last statement defined, ending the group. Use this to identify and modify the group by adding a Last statement. |
Logic Common Fields (Rows 3-4)

Use rows 3–4 to configure the context for this sheet’s logic fragment:
- Node ID of Source Devices (row 3) tells the sheet which LCC Node’s events (block detectors, turnout cards, etc.) it will monitor.
-
Starting Logic # (1–32) (row 4) sets the first statement number in the overall 32-statement sequence; each subsequent logic block auto-increments from there.
-
TIP: Use multiple Logic sheets to break your overall rule set into clear fragments:
-
Per Node When your logic needs to watch or drive devices on more than one LCC Node, give each Node its own sheet—with its own Node ID and a disjoint Starting Logic # range.
-
By Function or Zone Group related statements (e.g. all yard-distant rules, all home-signal rules) into separate sheets. Pick non-overlapping start-numbers, export each as a CDI-restorable text file, then restore them together to build the full logic.
-
Cross-Node Dependencies If a single logic chain depends on inputs from multiple Nodes, split those conditions across sheets targeted at each source Node—again using unique statement-number ranges so the firmware can merge them without conflicts.
-
| Row | Field | Description |
|---|---|---|
| 3 | Node ID of Source Devices | Node ID associated with the source of the events used in the sheet. For example, the Node ID associated with a block detection card (BOD Card). This value is used to generate the default Event IDs, which can be overwritten when using multiple Nodes. |
| 4 | Starting Logic # | Each Logic sheet defines a set or range of logic statements, starting with the number specified in this field. This allows for individual sets of Logic statements to be defined using multiple sheets and restored to a Node. For example, a sheet might define Logic statements 1–4, and a second sheet define Logic statements 5–8. |
Logic Statement (Rows 5–33)
The first Logic Statement block spans rows 5–33 of the sheet. Click the Append New Logic button in row 1 to append another Logic, starting with Row 34. Use the copy, move, and delete Logic buttons to manage the list of Logic statements.
Logic Group Fields (Rows 5-8)
 Use rows 5–8 to define each Logic Statement’s header and how it behaves:
- Logic # assigns the statement number and optionally shows its Description.
- Group Functionality flags whether the statement is Blocked, part of a Group, or the Last in its group.
- Description lets you add a brief human-readable note.
- Operator tells the engine how to combine Condition 1 and Condition 2 (AND / OR).
| Rows | Section | Purpose |
|---|---|---|
| 5 | Logic: # | Displays the Logic statement number, its group membership, and optional description. |
| 6 | Group Functionality | Selection indicate if this Logic statement is:Blocked (Logic is not used)Group (Logic is part of a group of Logics)Last (Logic is last or only logic in a group) |
| Description | Freeform cell for describing this Logic statement. | |
| 8 | Operator | Use to combine two conditions in a single Logic statement. For example, use AND to require both Condition 1 AND Condition 2 to be true, or OR logics when either conditional can be true. |
Logic Condition Fields (Rows 8-15)
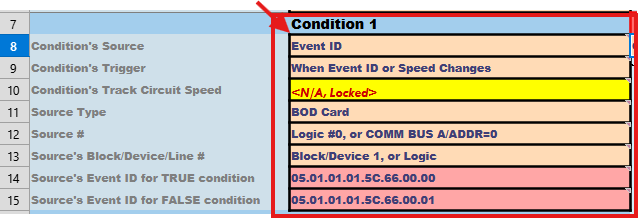 Before filling out the table below, note that depending on your Condition Source Type, certain fields will be locked (displayed as “<N/A” with a yellow background) when they’re not applicable. There are two main scenarios:
- Event ID Source – You’ll use the Trigger, Source Type, Source #, Line #, and Event ID fields.
- Track Circuit Source – You only need the Trigger and Track Circuit Speed fields.
Now complete the appropriate fields for your chosen source type:
| Row | Condition 1 & 2 Fields | Description |
|---|---|---|
| 8 | Condition’s Source | Event ID or track-circuit # for the first condition. When using Track Circuits, select the Track Circuit #. Reference the Mast sheet where it’s defined. |
| Operator | How to combine Condition 1 & 2 (AND / OR). |
|
| 9 | Condition’s Trigger | Trigger type (e.g., “When Event ID changes” or “On value update”). |
| 10 | Condition’s Track Circuit Speed | Track-circuit speed value that fires this condition. |
| 11 | Source Type | Card or device type (e.g., “BOD Card”, “Turnout Card”). |
| 12 | Source # | Device index or line number for the source. |
| 13 | Source’s Block/Device/Line # | The block/device/line # on the source card to test. |
| 14 | Source’s Event ID for TRUE condition | Event ID value to match for a TRUE condition. |
| 15 | Source’s Event ID for FALSE condition | Event ID value for a FALSE condition (optional) |
Logic Flow Fields (Rows 17-18)
 These fields control what happens immediately after a condition is evaluated:
- Logic Flow for True Condition: define the action (optionally send Event ID and optionally exit the Logic Group) when a statement evaluates to True.
- Logic Flow for False Condition: define the action when a statement evaluates to False.
| Row | Field | Description |
|---|---|---|
| 17 | Logic Flow for True Condition | What happens when the condition is True |
| 18 | Logic Flow for False Condition | What happens when the condition is False |
Logic Actions Fields Details (Rows 17-21)
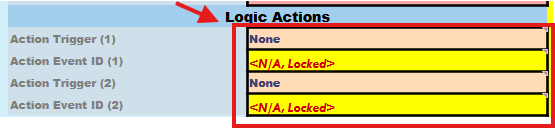 Use the Logic Actions fields to define what Event ID is sent—and exactly when—based on your condition’s outcome. You can define up to two actions (True and False branches). When you choose an Action Trigger, a dialog will pop up asking which Mast rule to use; scroll thru the list to the Mast sheet’s rule and selected, the correct Event ID is auto-filled into the Action Event ID field.
 You can also pick Immediate or Delayed timing and adjust retrigger settings as needed.
| Row | Field | Description |
|---|---|---|
| 17 | *Action Trigger (1) | 1 of 2 possible actions to be triggered. Selection determines the trigger. |
| 18 | *Action Event ID (1) | Event ID to be sent when this first action is triggered. |
| 19 | *Action Trigger (2) | 2of 2 possible actions to be triggered. Selection determines the trigger. |
| 20 | *Action Event ID (2) | Event ID to be sent when this second action is triggered. |
| 19-20 | Action Timing Delay, Action Time Interval | Action delay (before sending the Event ID) and the its time interval (milliseconds, seconds, minutes) |