JMRI LccPro Installation Guide
Table of contents
Table of contents
Introduction
LccPro™ is JMRI’s all-in-one application for working with LCC (Layout Command Control) nodes. It combines node discovery, CDI configuration, firmware upgrades, and event monitoring into a single modern interface. Introduced in JMRI 5.11 and officially released in JMRI 5.12, LccPro streamlines setup and troubleshooting by replacing the older lcctool with a more powerful, user-friendly front end.
JMRI LCC Tools: lcctool vs LccPro™
| Feature | ️ lcctool (Classic) | 🚀 LccPro™ (New) |
|---|---|---|
| Purpose | Original LCC Configuration utility | Modern LCC front-end with integrated workflow |
| Node Discovery | Lists Nodes and allows CDI access | Table view with search, grouping, filters, and detail panels |
| CDI Editing | Full CDI read/write (basic UI) | Integrated CDI editor with STL (Signal/Logic Table) access |
| Firmware Upgrade | Not built-in | One-click Upgrade button per Node row |
| Event Monitoring | Separate tool needed | Event Table & Traffic Monitor accessible from toolbar |
| User Interface | Simple forms, limited navigation | Modern GUI: searchable, filterable, detachable toolbars |
| Node Grouping | Not supported | Organize nodes into Node Groups for easier management |
| Status Display | Minimal | Status bar with connection info and live traffic indicator |
| Availability | Long-time JMRI standard (all versions) | New in JMRI 5.11 (test) and 5.12 (production, June 2025) |
| Best Use | Quick CDI edits, lightweight setups | Full layout management, ongoing monitoring, upgrades |
Workflow Recommendation
- Use lcctool if you only need quick CDI configuration or run on older JMRI versions.
- Use LccPro™ for modern layouts: it combines configuration, monitoring, and firmware management into one streamlined app.
Main Features
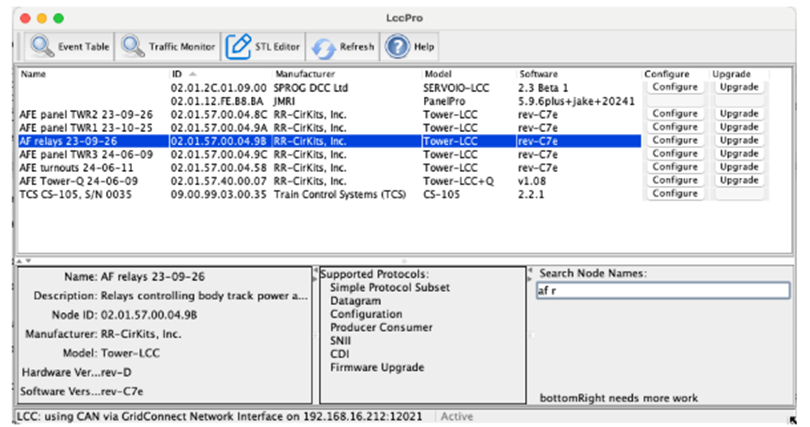
- Node Overview Table The primary view in LccPro presents all detected LCC nodes in a table. Each row lists a node and includes actionable buttons—Configure to edit node parameters (CDI), and Upgrade for firmware updates—if supported jmri.org.
- Detail Panels & Search Selecting a node reveals detailed information below: supported LCC protocols, node metadata, and more. You can filter and navigate nodes using a dynamic search field (case‑insensitive, incremental matching) jmri.orgYouTube+4jmri.org+4jmri.org+4.
- Grouping & Filtering Since version 5.11.2, nodes can be organized into Node Groups via a context (right-click) menu, and easily filtered in both the node table and the Event Table interface jmri.org+1.
- Quick Access to Related Tools
LccPro features a detachable toolbar that launches other essential LCC tools:
- Event Table, showing incoming events with connection details
- LCC Traffic Monitor, for live bus message tracking
- STL Editor, for advanced CDI logic and configuration editing It also includes Refresh and Help buttons for usability jmri.org+10jmri.org+10webserver.jmri.org+10.
- Status & UI Controls A bottom status bar indicates the active connection and whether there is ongoing CAN/LCC traffic. Panel display can be dynamically adjusted using sliders and disclosure triangles jmri.org.
Installing LccPro™
LccPro™ is distributed as part of JMRI 5.11 (test releases) and is officially included in JMRI 5.12 (production release, June 2025). It is not a separate download — installing the correct version of JMRI automatically includes LccPro.
Steps to Obtain and Install
- Download JMRI
- Visit the official JMRI download page: https://www.jmri.org/download/
- Choose the latest Production Release (≥ 5.12), or a Test Release (≥ 5.11.1) if you want the newest features sooner.
- Install JMRI
- Run the installer for your operating system:
- Windows: Download the
.exeinstaller and follow the setup wizard. - macOS: Download the
.dmgfile and drag the JMRI folder into Applications. - Linux: Extract the
.tgzarchive and run from the unpacked folder.
- Windows: Download the
- Run the installer for your operating system:
- Launch LccPro
- Inside the installed JMRI folder, open the
appsdirectory. - Run
LccPro(orLccPro.exeon Windows,LccPro.appon macOS). - Alternatively, on Windows/macOS, use the JMRI Launcher:
- Open the Launcher
- Select LccPro from the list of available applications
- Inside the installed JMRI folder, open the
- Connect to Your Layout
- Plug in your CANable USB ↔ CAN adapter.
- In LccPro, select the connection type (usually CAN via CANable/SLCan) from the Connections Preferences.
- Press Start to connect to the CAN network and begin discovering/configuring nodes.
Notes
- LccPro requires no extra installation beyond JMRI itself.
- NoIf you are running JMRI 5.10 or earlier, you will not see LccPro — upgrade to at least 5.11.1.
- 🖥️ JMRI works across Windows, macOS, and Linux, and project files can be shared between systems.